Issue Tabs for Jira – User Guide
How to use Issue Tabs for Jira: organize issues and project pages into tabs with diagrams and descriptions, edit, reorder, clone tab sets and keep nomnoml tabs.
Overview
Issue Tabs: Diagrams & Docs in Tabs for Jira adds tabs to Jira issues and project pages. Each tab has a title, an optional description and one diagram — BPMN, Graphviz, LaTeX Math, Mermaid, Vega-Lite or WaveDrom, chosen per tab. Every issue has its own set of tabs, and every project page has its own.
Diagrams are rendered in your browser from the source you type (or, for BPMN, drawn in a visual editor). The app runs on Atlassian Forge, stores the tabs in your Atlassian site and makes no external calls.
Install and open the panel
- Install Issue Tabs: Diagrams & Docs in Tabs for Jira from the Atlassian Marketplace.
- On an issue: open the apps menu under the issue’s title and choose Issue Tabs. Once added, the panel stays on the issue for everyone who opens it.
- On a project: Issue Tabs is in the project’s navigation (under More when the row is full). It shows the project’s own tabs, separate from its issues.
An issue without tabs says No tabs yet — press Add tab:

The tab bar
- Select a tab by clicking it; with the keyboard, Tab reaches the selected tab and ← / → / Home / End move between tabs.
- Rename: click the title of the selected tab, type, press Enter (Escape cancels).
- Reorder: drag a tab left or right.
- Save stores everything — tabs, titles, order, descriptions, diagrams. It is enabled only when something changed. Nothing is stored before Save; leaving the issue discards unsaved changes.
- ⋯ opens the menu: Add tab, Show / Hide description, Edit diagram, Edit tabs, Clone tabs and More apps by Simplify.
Edit tabs shows a pencil and a trash icon next to every tab. The trash icon asks Delete tab or Keep; a deletion takes effect on Save.
Show description adds a heading above the diagram (“Add a description” until you write one); click it to edit, Enter or ✓ to confirm.
Add a diagram to a tab
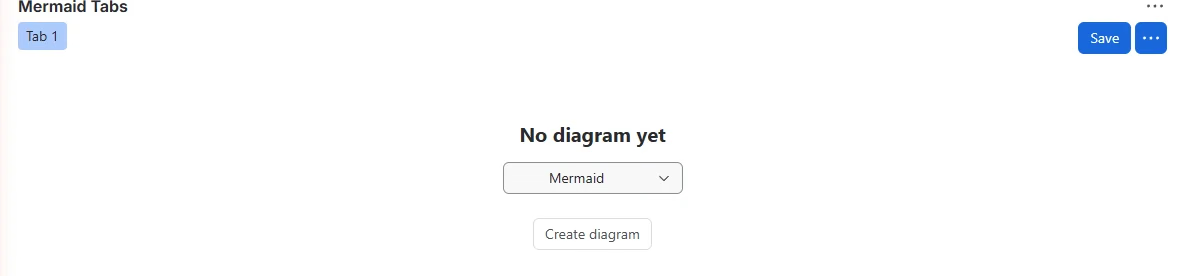
A new tab says No diagram yet. Choose the Diagram type — the list starts with the app’s own type — and press Create diagram: you start from a ready-made example of that type.
Edit the text
For text types, ⋯ → Edit diagram (or Create diagram) shows the source in a text box with four buttons above it:
- Diagram type — switch the tab to another type (the app asks first if the tab already has a source).
- Examples — ready-made sources of the current type; replacing a non-empty source asks first.
- Preview — the rendered diagram instead of the text box (the button then reads Edit).
- Done — back to the diagram.
If the source has a mistake, the tab shows Mermaid Error with Mermaid’s parser message (for example “Parse error on line 2: …”) until it renders again.
nomnoml is no longer offered for new tabs, but every existing nomnoml tab keeps opening, rendering and saving — like the Data model above. For new UML, choose Mermaid (class, sequence, state and ER diagrams).
Diagram types
| Type | What it draws |
|---|---|
| Mermaid | every Mermaid 11 diagram — flowchart, sequence, class, state, ER, Gantt, pie, mind map, timeline, journey, git graph, C4, quadrant, XY chart, block and architecture. Examples: Flowchart, Sequence, Mind map. |
| BPMN | BPMN 2.0 processes drawn in the full-screen bpmn.io modeler — events, tasks, gateways, sub-processes, pools, lanes and data objects. |
| Graphviz | DOT graphs with every Graphviz layout engine. Examples: Directed graph, Clusters, State machine. |
| LaTeX Math | TeX math typeset with MathJax 4 as one display formula; \\ breaks lines inside aligned or pmatrix. Examples: Quadratic formula, Matrix, Series, Aligned. |
| Vega-Lite | bar, line, pie and many other charts from a JSON spec with the data inside it (data.values); a spec that points at a URL is refused. |
| WaveDrom | digital timing diagrams in WaveJSON, for example { signal: [{ name: "clk", wave: "p..." }] }. |
Labels in any language (Cyrillic, Chinese…) work. On Jira’s dark theme diagrams are drawn with light lines; colours you set in the source are kept.
More tabs from the same issue
Clone tabs to another issue or project
⋯ → Clone tabs copies all tabs of this issue or project page — as they are on screen, unsaved changes included — to another place.
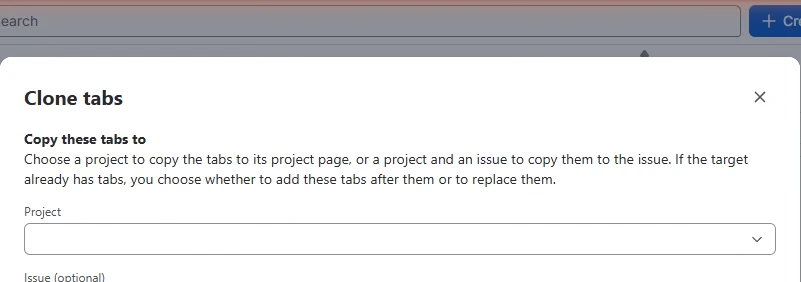
- Project — search by name or key. With only a project, the tabs go to its project page.
- Issue (optional) — search by key or summary; the tabs go to that issue’s panel.
- Copy tabs. If the target already has tabs, the window says how many and offers Add to existing (after the target’s own tabs) or Replace tabs.
You need permission to edit the target. A green message confirms the copy.
Saving, conflicts and limits
- One Save stores the whole set of tabs of the issue or project page.
- If someone else saved the same tabs after you opened them, Save says “Someone else saved these tabs in the meantime.” — Reload shows their version (your changes are dropped), Overwrite saves yours over theirs.
- The tabs of one issue or project page can be up to 4 MB together, large BPMN diagrams included.
- Deleting an issue deletes its tabs. Moving an issue to another project keeps them: the panel finds them through the issue’s history.
Permissions and data
- Who can see and change tabs: whoever may browse the project sees its issues’ tabs; whoever may edit the issue changes them. A project page’s tabs can be changed by everyone who may edit issues in that project. The checks run on the server.
- Scopes:
read:jira-work(permissions, project and issue search for Clone tabs) andstorage:app(the tabs). - Where data lives: in the app’s Forge storage inside your Atlassian site. Renderers and fonts ship inside the app; nothing is sent outside Atlassian. After an uninstall Forge keeps app storage for a while, so a reinstall brings the tabs back.
See the privacy policy.
Troubleshooting
- My change is gone after a reload — changes are stored only with Save.
- “Could not save the tabs. Your changes are still here — try again.” — a temporary storage error; press Save again.
- “These tabs are too large to save (limit 4 MB).” — split them over several issues or shrink large BPMN diagrams.
- “You don’t have permission to change these tabs.” — you may view the issue but not edit it.
- “This app needs an active license.” — a Jira admin renews it in Manage apps.
- “Something went wrong.” — press Reload; if it repeats, send the text under Details to support.
Related apps
- Mermaid Diagrams & Mind Maps in Tabs for Jira — Mermaid Tabs, Mermaid first.
- BPMN Process Modeler in Tabs for Jira — BPMN Tabs, BPMN first.
- LaTeX Math & Equations in Tabs for Jira — LaTeX Math Tabs, LaTeX Math first.
- Graphviz Graphs & Vega-Lite Charts in Tabs for Jira — Graphviz Tabs, Graphviz first.