Documentation – Secret Sentinel
Overview
Secret Sentinel automatically detects and redacts leaked credentials inside Atlassian products.
Secret Sentinel is delivered as two separate Forge apps:
- Secret Sentinel for Confluence
- Secret Sentinel for Jira
Each app works independently within its product. Jira incident creation from Confluence detections is optional and configurable.
Important note:
To create Jira incidents from Confluence detections, Secret Sentinel must be installed in both Confluence and Jira on the same Atlassian site (two separate app installations).
Video walkthrough
If you prefer a guided walkthrough, you can watch a short video that demonstrates how Secret Sentinel works in practice.
The video covers:
- Secret detection and redaction in Confluence
- Automatic Jira incident creation from Confluence
- Secret detection and redaction in Jira work items and comments
- Jira incident escalation for Jira content
▶ Watch the full walkthrough on YouTube:
https://youtu.be/Sxh1_zrA5Ow
Install the app
Install the relevant Secret Sentinel app(s) from the Atlassian Marketplace and approve the required permissions during installation:
- Install Secret Sentinel for Confluence to protect Confluence content.
- Install Secret Sentinel for Jira to protect Jira content.
- Install both if you want Confluence detections to automatically create Jira incidents.
Confluence: Detecting and redacting secrets
Step 1: Create content
Create a Confluence page, comment, or inline comment and paste the following content.
# Deployment notes

Database connection:
password=SuperSecret123

AWS access:
AKIA1234567890ABCDEF

GitHub token:
ghp_abcdefghijklmnopqrstuvwxyz0123456789ABCD

Slack bot token:
xoxb-1234567890-abcdef123456

JWT example:
eyJhbGciOiJIUzI1NiIsInR5cCI6IkpXVCJ9.eyJ1c2VySWQiOjEyMzQ1fQ.ZXlKaGJHY2lPaUpJVXpJMU5pSXNJblI1Y0NJNklrcFhWQ0o5

This one should be ignored:
password=changeme

End of document.
Save the page or comment.
If this is an inline comment, make sure to update and save the page itself.
Step 2: Refresh the page
Wait a short moment and refresh the page.
Expected result
Detected secrets are automatically redacted in place.
Database connection:
[REDACTED by Secret Sentinel: generic_password_assignment, Supe****t123]

AWS access:
[REDACTED by Secret Sentinel: aws_access_key_id, AKIA****CDEF]

GitHub token:
[REDACTED by Secret Sentinel: github_token, ghp_****ABCD]

Slack bot token:
[REDACTED by Secret Sentinel: slack_token, xoxb****3456]

JWT example:
[REDACTED by Secret Sentinel: jwt, eyJh****Q0o5]

This one should be ignored:
password=changeme

End of document.
Confluence: Automatically creating Jira incidents
This step is optional and only required if you want Secret Sentinel to create Jira incidents.
Step 1: Install the Jira app
Ensure Secret Sentinel for Jira is also installed on the same Atlassian site.
Step 2: Configure Jira escalation in Confluence
Open the Secret Sentinel global settings in Confluence and configure:
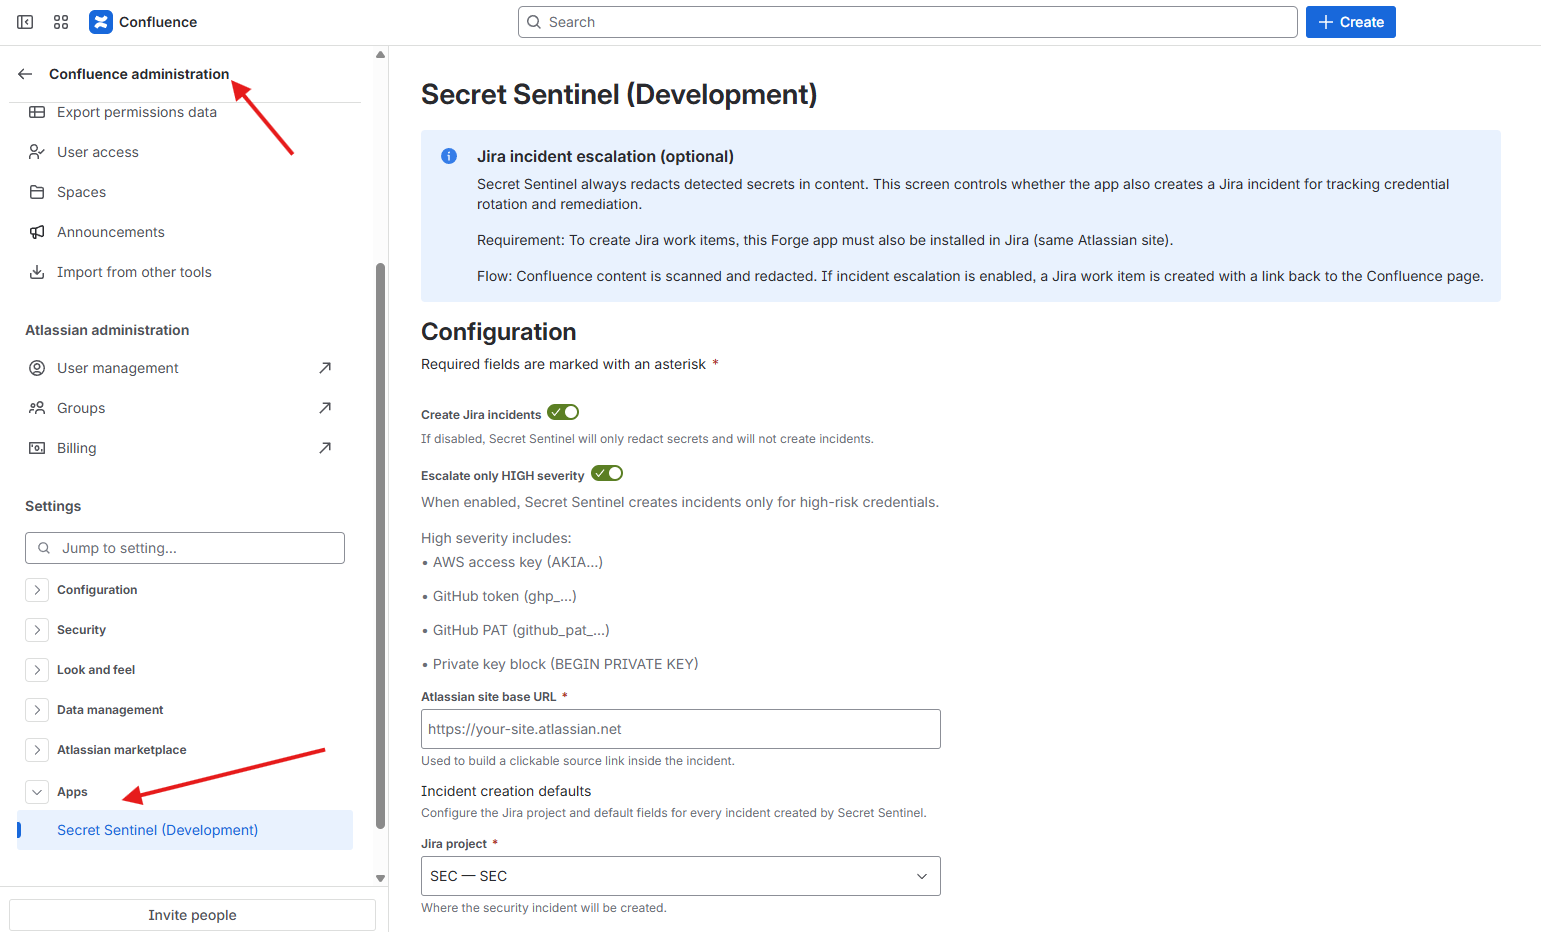
- Jira project where incidents should be created
- Issue type
- Priority
- Default assignee (optional)
- Severity rules
Save the configuration.
Note:
These settings apply only to Confluence detections.
Step 3: Trigger a new detection
Repeat the steps from the Confluence section by creating or updating a page or comment with leaked credentials.
Result:
- Content is redacted in Confluence
- A Jira security incident is created automatically in the selected project
Jira: Detecting and redacting secrets
Secret Sentinel for Jira also protects Jira content directly.
Step 1: Create a Jira work item or comment
Create a Jira work item or add a comment and paste the same test content.
# Deployment notes

Database connection:
password=SuperSecret123

AWS access:
AKIA1234567890ABCDEF

GitHub token:
ghp_abcdefghijklmnopqrstuvwxyz0123456789ABCD

Slack bot token:
xoxb-1234567890-abcdef123456

JWT example:
eyJhbGciOiJIUzI1NiIsInR5cCI6IkpXVCJ9.eyJ1c2VySWQiOjEyMzQ1fQ.ZXlKaGJHY2lPaUpJVXpJMU5pSXNJblI1Y0NJNklrcFhWQ0o5

This one should be ignored:
password=changeme

End of document.
Save or update the work item.
Expected result
Secrets are automatically redacted in:
- Work item title
- Work item description
- Comments
Jira: Automatically creating Jira incidents
Jira detections use a separate configuration.
Step 1: Open Secret Sentinel settings in Jira
Navigate to the Secret Sentinel global settings in Jira.
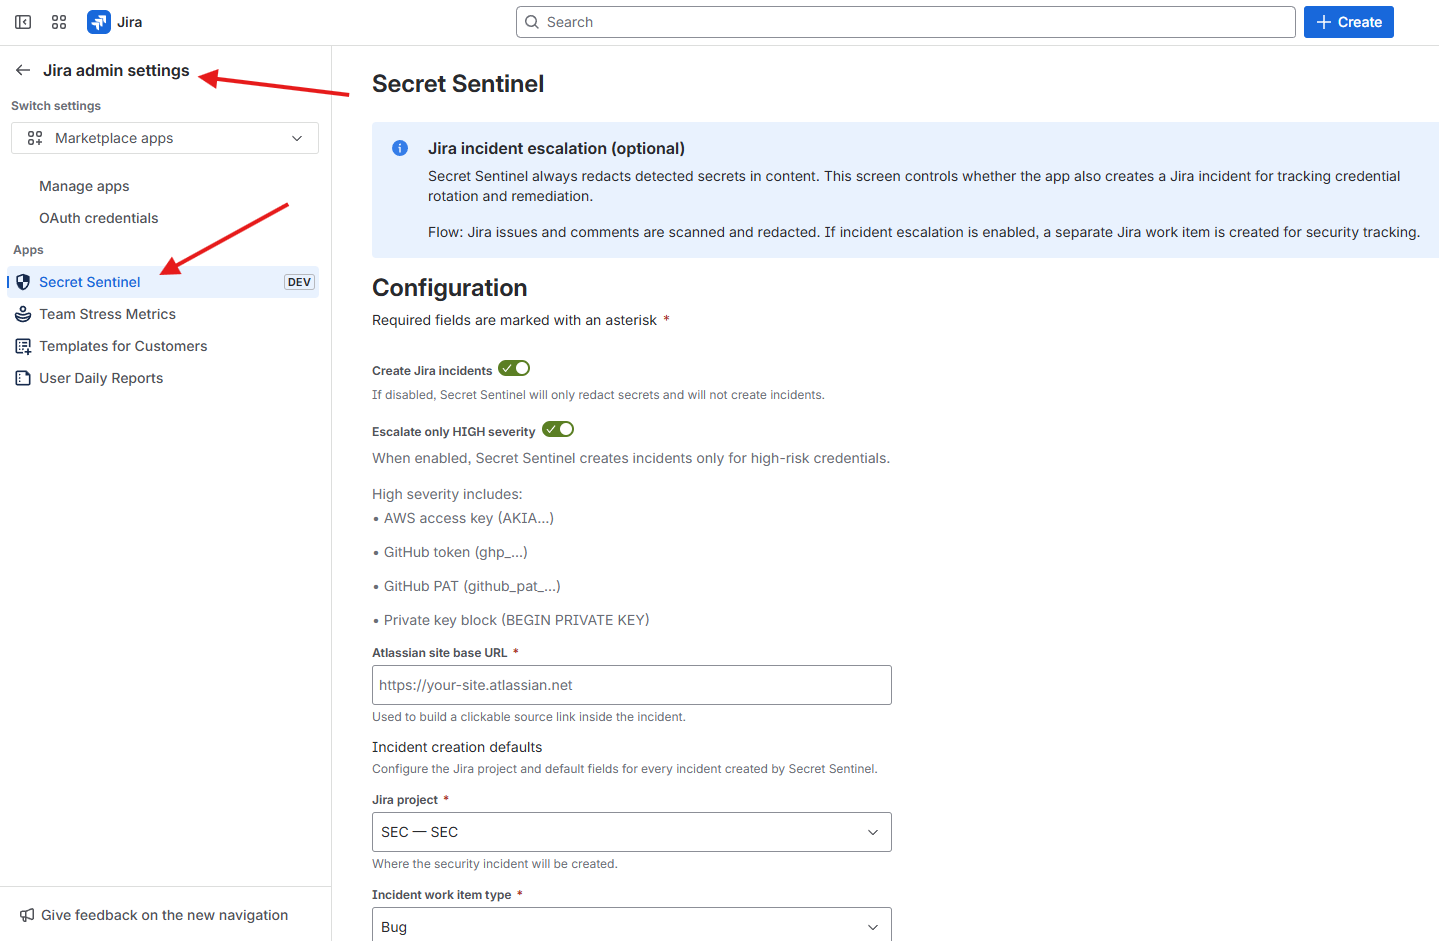
Step 2: Configure Jira escalation for Jira content
Configure the following fields:
- Target Jira project for incidents
- Issue type
- Priority
- Default assignee (optional)
Save the settings.
Important note:
Jira and Confluence configurations are independent.
Enabling Jira escalation in Confluence does not enable it for Jira, and vice versa.
Step 3: Trigger a Jira detection
Create or update a Jira work item or comment containing leaked credentials.
Result:
- Content is redacted
- A Jira security incident is created automatically
Supported high-severity secrets
By default, escalation rules apply to the following high-risk credentials:
- AWS access keys
- GitHub tokens
- GitHub personal access tokens
- Private keys
Other secrets are safely redacted but may not trigger incident creation depending on configuration.
Architecture highlights
- Fully built on Atlassian Forge
- Backend dependencies:
- @forge/api
- @forge/events
- @forge/kvs
- Frontend dependencies:
- @forge/react
- @forge/bridge
- React
- No external services
- No data leaves Atlassian infrastructure